

Manage your team and balance
Grant a colleague write or read-only access in the Business Console, then switch teams, read the Your, Full access, and Read only badges, apply a promocode, and top up or open billing history.
The sidebar shows which team you are working in and that team’s access level and balance. You can switch teams, read the access badges, see your balance, top up, apply a promocode, and open your billing history there.
The agent has no commands for your team or balance. Adding money and adding company members take place in the Business Console. Top up and Billing history open it in a new tab.
A team is the account unit that owns your projects and one balance. Every run draws on its team’s balance, whichever project it belongs to.
You work in one team at a time. A team can be your own personal team or one shared with other people, and you may belong to several.
Switch teams
Section titled “Switch teams”The team switcher sits at the top of the sidebar on your project list and shows the team you are in now; inside a project there is no switcher. Your own personal team reads Personal, and a read-only team carries a Read only badge.
Open the switcher to see every team you can reach. Each row shows the team’s name and one access badge, Full access or Read only. Your personal team also carries Your. Selecting a team takes you to that team’s project list.
On sign-in the platform selects a team for you: the one you used last, then your personal team, then your first available team. There is no team-choosing screen. See the tutorial’s sign-in step.
Read-only access
Section titled “Read-only access”Your access to a shared team is either full or read-only, and the switcher badge tells you which. Full access lets you do everything on the team. Read-only access lets you open and read everything the team owns, including projects, pipelines, runs, datasets, and results. It does not let you change them.
On a read-only team these write controls are hidden outright:
- create a project
- add a secret
- chat with the agent (the chat input and the new-chat button are gone)
- apply a promocode or top up (Apply promocode and Top up are removed from the Balance menu)
- edit a message you already sent to the agent
Reads work as normal, and Billing history stays available. Other changes, including editing a pipeline, deploying, and uploading data, stay visible but are refused. What you see depends on your other teams: if every team you belong to is read-only, the refusal reads “You do not have access to this resource”; if you also have a full-access team elsewhere, the resource is masked instead and the toast says it was not found.
When you have no team access
Section titled “When you have no team access”If you belong to no team, you land on the Waiting for access page. The platform has nothing to show you until someone gives you access to a team. Ask a teammate with Full access to add you — see Give someone access.
A blocked team never appears. The platform filters it out of the switcher and everywhere else, so you cannot select it.
Give someone access
Section titled “Give someone access”Grant access in the Business Console, the same application Top up opens. The platform does not add members; it reads the membership after you save it.
The colleague must already have a Toloka account. You must have Full access on the company. A View only member does not see the Share access tab.
Adding a company member with Full access grants write access on all of that company’s teams and projects. To grant only one team, open that team’s Share access tab and click Add team member, with the same Full access and View only options.
- Ask the colleague to open https://console.toloka.ai/profile. The heading is Profile. Under Personal data, copy Login with Copy Login. If the page shows hyphens in the login, the control copies the value without them.
- Open https://console.toloka.ai/companies. The heading is Companies. Open the company.
- Open the Share access tab.
- Click Add company member. The Add company member dialog opens.
- Paste the login into Login or email. Leave Full access selected to give write access; that is the default. Choose View only for read-only access. On the platform, that member’s badge reads Read only.
- Click Add member. Cancel closes the dialog without adding the member.
Account not registered means that login does not match a Toloka account. Copy Login from Profile again. You can’t add this account to the company appears if you add your own account; use the colleague’s login.
If they already have View only, they already appear in the member list on the Share access tab. Open Edit access on that row, choose Full access, and click Save.
A colleague who already belongs to another team will not land on Waiting for access. They open the team switcher on the project-list sidebar and select the new team.
Your balance
Section titled “Your balance”The sidebar shows a Balance item with the team’s current balance beside it, in US dollars. An empty balance reads $0.00.
The team owns the balance, and all of its projects share it. Every run draws on it as it labels. Pricing and billing covers funding a run, the deploy gate on an empty balance, and the automatic pause when funds run out.
Click Balance to open its menu. On a full-access team the menu has three items — Apply promocode, Top up, and Billing history. On a read-only team it shows only Billing history. The balance amount is always visible.
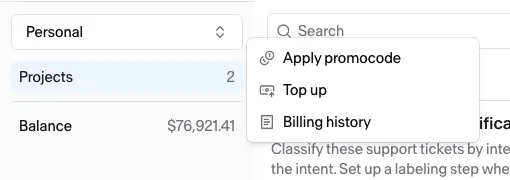
Top up
Section titled “Top up”Top up opens the Business Console’s billing page in a new tab. You add money there, then return to the platform. The platform has no payment form.
When a run needs more funds, its banner links to the same billing page with a needed amount already in the link. The banner offers up to three amounts — Min, Expected, and Max — so you can cover just the next step or the whole worst case. The same banner also appears before you deploy, inside the cost window. Resume or cancel a run covers what happens when a run runs out of funds mid-way.
Apply a promocode
Section titled “Apply a promocode”A promocode adds credit to your balance. Apply promocode opens a dialog with one field, Promocode.
Enter the code and click Check to preview it. A valid code shows “The promo is active” in green, with its dollar value when it carries one. An unknown or inactive code shows “The promo code does not exist or is invalid” in red.
The code credits the team you have selected, so switch to the right team first. Then click Apply. The dialog closes either way — on success a confirmation appears and the Balance amount refreshes; on failure the toast reads “Unable to apply promocode”. Cancel closes the dialog without applying anything.
You can also enter a code when you register. The registration form has a Promo code (optional) field.
Billing history
Section titled “Billing history”Billing history opens the Business Console billing page in a new tab. Top up links to the same page. The platform keeps no billing history of its own. The item links to the console and stays available to read-only members.
What happens outside the platform
Section titled “What happens outside the platform”Some account tasks are not on the platform at all:
- Team membership is granted in the Business Console, not on the platform. See Give someone access. The platform only reads the result.
- Payments, invoices, and payment methods live in the Business Console. The platform has no payment form, invoices, or list of payment methods. It reads your balance and links to the console for anything that moves money.
Related
Section titled “Related”- Pricing and billing — how a run is priced and how your balance is drawn down
- Get your first labeled dataset — signing in and landing in your team
- Resume or cancel a run — what happens when the balance runs out mid-run